Evaluating Training Results
After training is complete or stopped, you can evaluate the results in the Training Results dialog, as well as generate previews of a test set or the original data to evaluate the predictive model (see Previewing Model Inference).
The Training dialog includes detailed information about the model being trained and the model input(s) in the collapsible Information box at the top of the dialog, as well as a Graph tab and List tab.
The Graph tab, shown below, includes a graph on which epochs and the selected metrics are plotted, as well as the inference for each epoch if visual feedback was selected (see Enabling Visual Feedback). In addition, you can load the model at a selected checkpoint, if the checkpoint cache was enabled (see Saving and Loading Model Checkpoints).
Training results (Graph view)

You can do the following in the Training dialog on the Graph tab:
- Scroll through the plotted graph and review the inference for each epoch, if visual feedback was selected.
- Change the range of epochs that are plotted with the Epochs sliders.
- Select the metrics that are plotted in the Metrics drop-down menu.
- Load a selected checkpoint, if the checkpoint cache was enabled. You can then save a copy of the model at the loaded checkpoint (see Saving and Loading Model Checkpoints).
- Modify the opacity of the inference and input, as well as zoom and pan the checkpoint image by dragging with the left and right mouse.
- Click the Export Movie button to export a movie that scrolls through the graph and the checkpoint images (see Exporting Movies of Training Results).
- Click the Export button to export an image of the graph in the PNG file format.
You can also view the results on the List tab, on which the learning rate and other metrics are shown in a table view for each epoch.
Training results (List view)
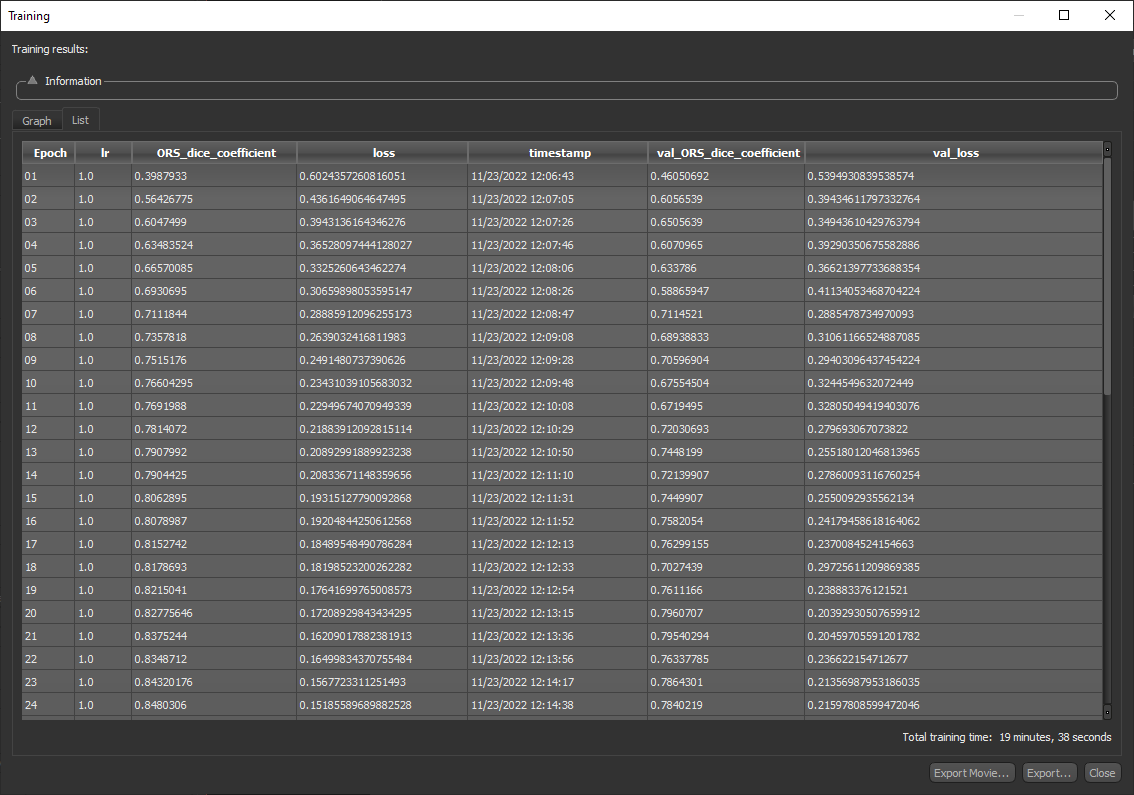
You can do the following in the Training dialog on the List tab:
- Review the detailed results for each epoch.
- Click the Export Movie button to export a movie that scrolls through the graph and the checkpoint images (see Exporting Movies of Training Results).
- Click the Export button to export the results in the comma-separated values (*.CSV extension) file format.
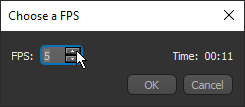
Do the following to export a movie of the plotted graph and visual feedback image sequence:
-
Right-click the required model in the Deep Learning Tool and then choose Display Training History and the appropriate training session in the pop-up menu.
The Training Results dialog appears.
-
Adjust the opacity of the inference and/or input, if required.
-
Click the Export Movie button.
-
Choose the required frames-per-second setting (FPS) in the Choose an FPS dialog, as shown below.
-
Click OK and then choose a file name and type — APNG, AVI, MKV, or animated GIF — in the Export Visual Feedback to File dialog.
-
Click Save.
